For most trees and shrubs, the right approach is slow, infrequent watering that soaks the feeder-root zone 12 to 18 inches deep rather than quick daily sprinkles. Use the 10-gallon-per-inch-of-trunk-diameter rule, delivered through a soaker hose, drip line, or deep-root probe. Before you turn anything on, push a screwdriver into the soil near the drip line. If it stops short of 6 to 8 inches, water now.
TL;DR:
- Proper deep watering involves applying about 10 gallons per inch of trunk diameter, targeting 12 to 18 inches deep at the drip line.
- Use moisture tests with a screwdriver before and during watering sessions to avoid under- or overwatering, especially in various soil types.
- Drip lines, deep-root probes, or watering bags are suitable tools depending on tree size, soil, and planting stage, with each having specific advantages.
- Long soaking sessions are unnecessary; most trees benefit from several shorter cycles with rests, particularly in clay or compacted soil that resists water infiltration.
- Regularly record and adjust runtime based on successful depth achievement, and skip watering if soil remains moist past 6 to 8 inches.
Table of Contents
- What Are the Best Deep Root Watering Methods to Choose?
- How Much Water Should You Apply, and How Often?
- How Do You Run a Deep Watering Session Step by Step?
- How Does Soil Type Change Your Watering Plan?
- Which Tools and DIY Setups Actually Work?
- What Are the Warning Signs of Under or Overwatering?
- How Do Professionals Approach Deep Root Watering?
- Why Testing Beats Guessing Every Time
- Get Professional Help Designing Your Irrigation System
- Where This Guidance Comes From
- Sources
- FAQ
What Are the Best Deep Root Watering Methods to Choose?
Pick your method by tree size, soil type, and how many plants you’re covering, not by whatever happens to be in the garage. A single sapling and a mature oak have completely different water demands, and the wrong tool for the job either wastes water or leaves roots thirsty.
- Soaker hose or drip line: Best for multiple trees or a whole planting bed. Slow, even coverage, but takes time to lay out and needs a timer to be reliable.
- Deep-root probe or needle: Good for a single mature tree with compacted soil where surface water won’t infiltrate. Fast to use, but it can only treat a few spots at a time, so it works better as a supplement than a sole method.
- Watering bags: Ideal for one or two newly planted trees. Zero setup skill required, just fill and walk away, but they only wet the area right around the trunk, not the wider root zone mature trees need.
- Buckets or basins: Cheapest option for a single sapling on a budget. Labor-intensive if you’re watering more than a couple of trees regularly.
A compacted, hard-packed spot under a young tree often calls for a probe to break through the surface glaze, paired with a basin to hold water once it starts penetrating. A row of five newly planted street trees is a drip-line job, full stop.
How Much Water Should You Apply, and How Often?
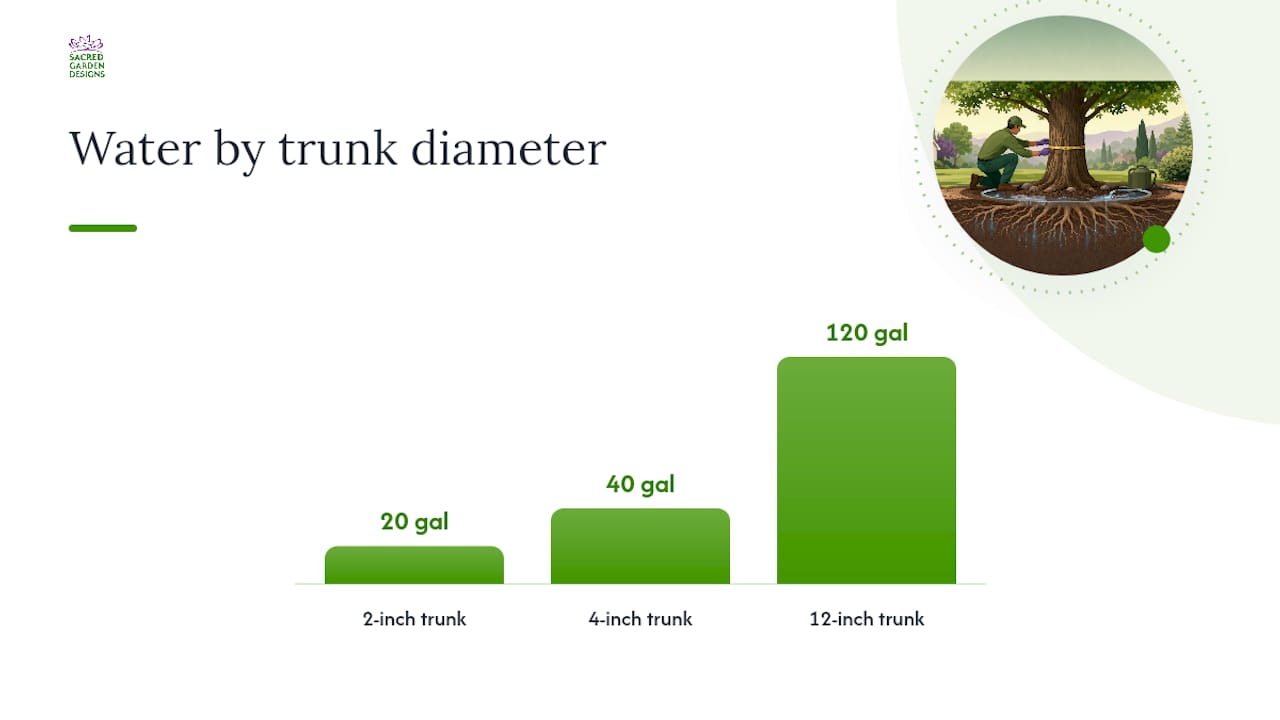
Start with the 10-gallon-per-inch-of-trunk-diameter baseline, measured at knee height. A tree with a 4-inch trunk diameter needs roughly 40 gallons per deep watering session.
Converting that into a runtime just takes basic emitter math.
- 0.5 gph emitter, four emitters running: 2 gallons per hour combined. Forty gallons takes 20 hours, which is unrealistic in one sitting, so you’d split it across two or three sessions or add more emitters.
- 1 gph emitter, eight emitters running: 8 gallons per hour combined. The same 40 gallons takes about 5 hours, a far more workable single session.
Frequency depends on age and season. Newly planted trees need moisture checks daily for the first two weeks, tapering to twice weekly through the first growing season. Established trees usually need deep watering only every 2 to 4 weeks, stretching to weekly during summer heat waves. Skip watering if the screwdriver test still meets resistance at approximately 6 to 8 inches depth.
Statistic to remember: 10 gallons per inch of trunk diameter is the number every extension office repeats for a reason. It scales cleanly whether you’re watering a 2-inch sapling or a 12-inch shade tree, and it’s the single easiest figure to keep in your head.
How Do You Run a Deep Watering Session Step by Step?
Follow this sequence and you’ll rarely overwater or underwater a tree again.
- Find the drip line. Feeder roots cluster near and beyond it, not against the trunk, so plan your emitter or probe positions in a ring under the outer canopy.
- Set a conservative flow rate first. Start emitters or a soaker hose at a low setting rather than full blast, especially on sloped or compacted ground.
- Watch for runoff. If water starts pooling or running downhill before it soaks in, stop and let it rest 20 to 30 minutes before resuming, a technique known as cycle-and-soak.
- Check depth at three or four points. Use the screwdriver or a soil probe around the root zone, not just at one spot near the trunk, to confirm you’ve hit 12 to 18 inches evenly.
- Adjust and repeat. If depth is uneven, add emitters in the dry spots or extend runtime rather than cranking up flow everywhere.
- Write down the runtime that worked. A sticky note on the timer or a line in your phone saves you from re-testing every single time.
Pro Tip: Test depth at the edge of the drip line, not next to the trunk. Feeder roots are sparse within 6 inches of the trunk, so a screwdriver that penetrates easily there tells you almost nothing about the root zone.
How Does Soil Type Change Your Watering Plan?
Soil texture decides how long water needs to run and how many cycles you’ll need to avoid runoff. Sandy soil drains fast and needs shorter, more frequent sessions. Loam holds moisture evenly and is the most forgiving to work with. Clay is the tricky one: it absorbs slowly, so a single long soak often just runs off the surface instead of sinking down.
- Sandy soil: Water more often, in shorter bursts, since it can’t hold moisture long between sessions.
- Loamy soil: The easiest baseline. Standard runtimes from your emitter math generally hold up without heavy adjustment.
- Clay soil: Expect to break the total volume into three or four cycles, resting 20 to 30 minutes between each to let water percolate before adding more.
- Slopes and compacted ground: Build small berms or terraces on the downhill side so water can’t just run off before soaking in, and consider aerating hard-packed soil first.
Mulch changes the math too. A 2 to 3 inch layer keeps soil temperatures down and evaporation slow, which stretches the interval between deep watering sessions. Just keep it a few inches off the trunk itself. Piled mulch against bark traps moisture against the trunk and invites rot and pests.
Which Tools and DIY Setups Actually Work?
Most homeowners land on one of a handful of setups, and the details matter more than the price tag.
- Drip emitters: Choose 0.5 to 1 gph pressure-compensating emitters. Pressure compensation matters because it keeps flow even whether an emitter sits at the start or end of a long line, so every tree gets its fair share.
- Deep-root probes: Insert slowly, limit depth to 8 to 12 inches, and keep them away from the trunk where feeder roots are actually concentrated. Rapid insertion or removal can compact the soil around the probe hole, especially in clay.
- Tree bags: Hold 15 to 20 gallons and drain slowly over several hours, useful for a young tree but not a substitute for wider root-zone coverage once the tree matures.
- Five-gallon buckets: Drill a few small holes in the bottom for a slow trickle instead of dumping water all at once, which just runs off the surface.
- Timers and backflow preventers: A basic hose-end timer removes the guesswork of standing there for hours, and a backflow preventer protects your home’s water supply. Drain and disconnect both before the first hard freeze.
What Are the Warning Signs of Under or Overwatering?
Shallow watering shows up as wilting leaves even after a recent watering, plus roots you can see near the surface. That pattern means water never made it past the top few inches, and the fix is usually adding more emitters at low flow rather than blasting more water for less time.
- Overwatering signs: Yellowing leaves, fungal growth at the base, or a persistently soggy smell in the soil. Ease off frequency and check drainage before adding a probe.
- Underwatering signs: Leaf scorch, early leaf drop, and soil that resists the screwdriver test past a couple of inches.
- Probes vs. broad coverage: Probes fix a stubborn dry pocket, but they’re a spot treatment, not a full root-zone solution, so pair them with drip or soaker coverage.
- Winter watering: During dry, snow-free stretches with soil above 40°F, evergreens especially may still need a deep watering session to avoid winter desiccation.
How Do Professionals Approach Deep Root Watering?
A landscaping company has spent over 25 years building water-wise landscapes across drought-prone terrain, work that’s earned awards and featured on a home improvement show. That kind of repetition teaches you that the method matters less than matching it to the site.
On a clay-heavy backyard renovation, the crew skipped a single long soak entirely and ran three short cycles with 25-minute rests between them, because the first attempt at full runtime just pooled and ran off the slope.
For a fresh planting of young shade trees, they leaned on watering bags for the first two weeks, then transitioned to a drip grid once root establishment was confirmed with a soil probe.
A field-ready checklist: survey soil type and slope first, map emitter or probe placement to the drip line, run a conservative first session, verify depth at multiple points, and log the runtime that worked before moving to the next tree.
Why Testing Beats Guessing Every Time
Homeowners keep asking for a fixed schedule, a set number of minutes twice a week that they can put on autopilot. That instinct is the most common way trees actually die. Roots don’t care what day it is. They care whether the soil at 12 inches is wet or dry, and a calendar can’t tell you that.
Grab a screwdriver, walk to the drip line, and push it into the soil. Do one slow, deep session this week, spread across the critical root zone rather than dumped at the trunk. Then write down the runtime that got you to depth. That single number saves more guesswork than any watering app ever will.
— Denise Buchanan
Get Professional Help Designing Your Irrigation System
Figuring out the right emitter count, runtime, and placement for your specific soil and tree mix takes some trial and error, and not everyone has the time for it. Sacred Garden Designs designs and installs irrigation systems built around your actual site conditions instead of a generic formula, drawing on 25 years of water-wise landscaping work across drought-prone terrain.

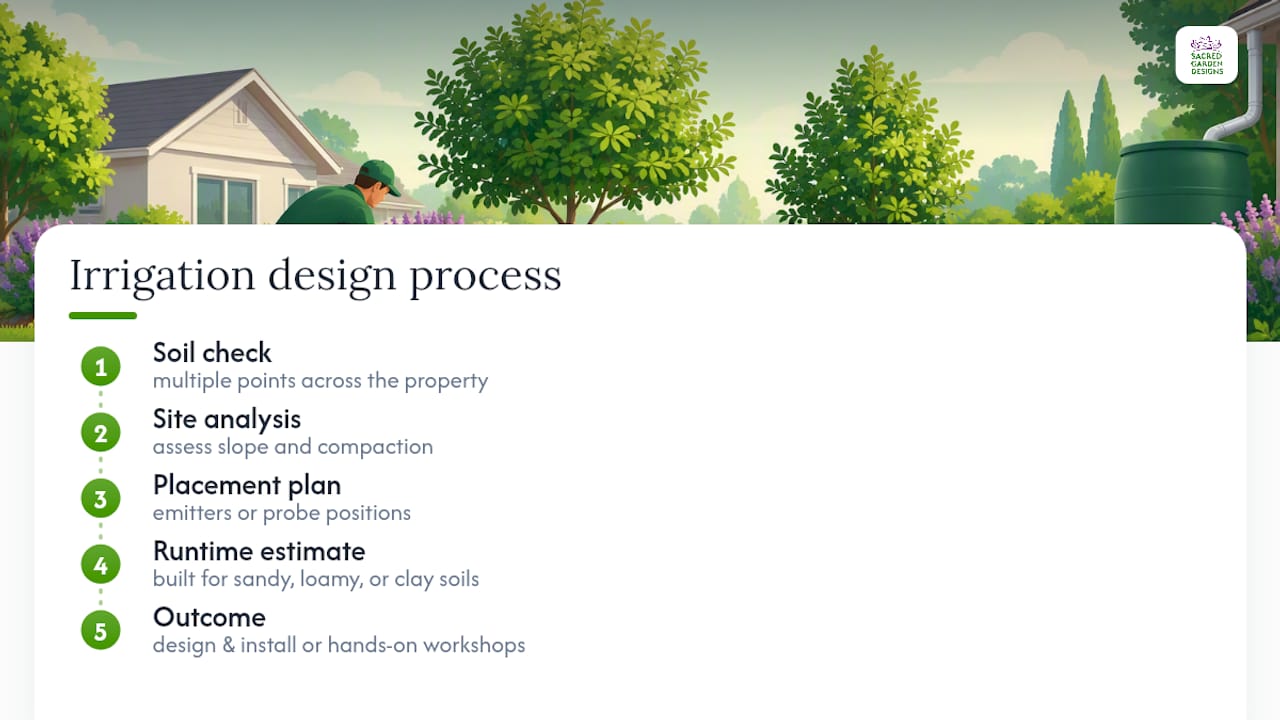
A consultation typically starts with a soil check at multiple points across the property, a look at slope and compaction, and a plan for emitter placement or probe positions that matches your trees and shrubs. From there, the crew builds out a runtime estimate specific to your soil, whether that’s sandy, loamy, or heavy clay. If you’d rather learn the techniques yourself, Sacred Garden Classes and Workshops cover hands-on irrigation skills you can apply immediately.
For a full irrigation design and installation project, start with the landscape design services page to see what a professional site assessment includes, or browse the complete services overview to book an initial consultation.
Where This Guidance Comes From
This guide draws on Colorado State University Extension, University of Nebraska–Lincoln, University of Maryland Extension, and Denver Water. Local water restrictions vary, so check with your municipal provider before installing new irrigation.
Sources
- GardenNotes: Watering Trees and Shrubs (Colorado State Univ. Extension)
- Efficient and effective tree watering (University of Nebraska–Lincoln)
- Tree care guide (Denver Water)
- Watering trees and shrubs (University of Maryland Extension)
FAQ
How Do You Water Tree Roots Deeply?
Apply water slowly at the drip line using a soaker hose, drip line, or deep-root probe until it reaches 12 to 18 inches deep, using roughly 10 gallons per inch of trunk diameter as your target volume. Check progress with a screwdriver test rather than watching the clock.
How Do I Make a DIY Deep Root Watering System?
A simple setup uses a soaker hose ring placed at the drip line, connected to a hose-end timer for consistent runtime. For a single tree, drilling small holes in the bottom of a 5-gallon bucket creates a slow-drip alternative with no equipment cost beyond the bucket itself.
What Is the Best Deep Root Watering Tool?
There’s no single best tool. A drip line with pressure-compensating emitters at 0.5 to 1 gph suits multiple trees or beds, while a deep-root probe works best for one mature tree in compacted soil. Watering bags are the simplest option for newly planted trees.
How Long Should You Deep Water a Tree?
Runtime depends on trunk diameter and emitter flow. A 4-inch-diameter tree needing 40 gallons through eight 1 gph emitters takes about 5 hours, while the same volume through fewer or weaker emitters can take far longer, so calculate your setup’s actual flow before assuming a fixed time.