A rain garden is a shallow, planted bowl that catches roof and driveway runoff and lets it soak into the ground instead of running down the street. The single rule that governs everything else: design it to drain within 24 to 48 hours, or you’re just building a mosquito nursery. Before you dig, confirm setbacks from your foundation and septic system, and call 811 to get utility lines marked.
TL;DR:
- Proper site assessment, including soil drainage and setback distances, is critical to avoiding long-term issues like flooding or erosion.
- A 600-square-foot roof may require a rain garden of 120 to 180 square feet, with deeper filter beds helping reduce surface footprint in tight yards.
- Soil infiltration rates above 0.5 inches per hour generally need no soil amendment, while slower rates demand larger filter beds or underdrains.
- The ponding depth should be kept between 4 and 8 inches to ensure fast draining and reduce mosquito breeding risks.
- Successful rain garden design depends heavily on soil testing and appropriate plant zoning to match plant tolerance to wetness levels.
Table of Contents
- What Makes a Good Rain Garden Site (and How Big Should It Be)?
- How Do You Test Your Soil’s Drainage Before Digging?
- Designing the Bowl: Depth, Inlets, and Overflow
- Choosing Soil Media: Native Ground or a Built-In Filter Bed?
- Which Plants Go Where in a Rain Garden?
- Building the Rain Garden Step by Step
- Planting and Establishing Your Rain Garden
- How Do You Maintain a Rain Garden Season by Season?
- Who Actually Builds These Well: Author and Project Notes
- Where to Find Official Rain Garden Manuals and Plant Lists
- What Most Rain Garden Advice Gets Backwards
- Ready to Build a Rain Garden That Actually Works?
- Sources
What Makes a Good Rain Garden Site (and How Big Should It Be)?
Location decides whether your rain garden works or turns into a soggy problem near your house. Keep the garden at least 10 feet from your foundation, and further still from septic drain fields, since the EPA’s guidance on rain gardens is explicit about that distance for a reason: water that pools too close to a foundation can find its way into a basement or crawl space. Before any digging starts, call 811 (or your local utility locate service) so buried gas, electric, and water lines get flagged.
Once you’ve ruled out the danger zones, the next question is how much roof and pavement actually drains toward your chosen spot. Walk the property after a storm and watch where water actually goes. Then estimate the impervious area feeding that path.
- Measure roof sections, driveway, and any patio surfaces draining to the garden site (length times width in square feet).
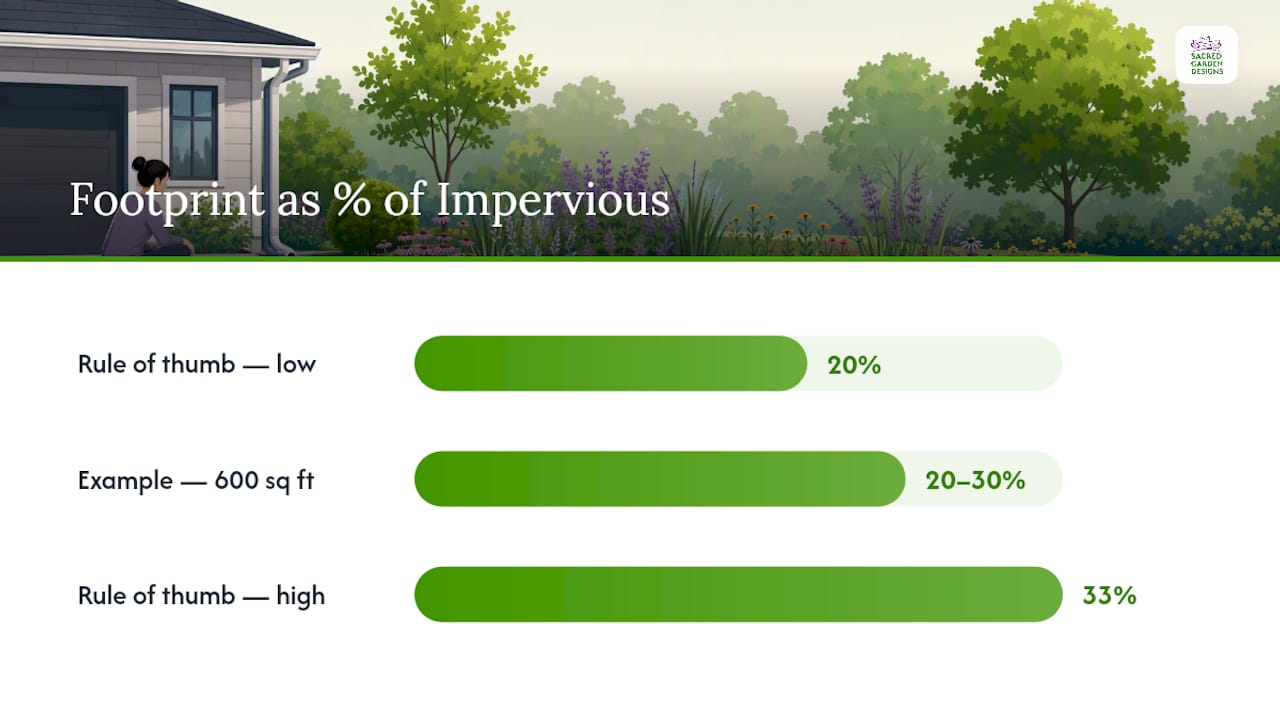
- A rough rule of thumb: a rain garden footprint around a fifth to a third of the contributing impervious area generally handles typical residential runoff in many soil types.
- If your soil drains slowly, you’ll need a bigger footprint or a deeper filter bed to hit the same capacity.
- Multiple downspouts can share one garden if you can route them without crossing walkways or digging under a driveway.
Quick sizing example: A 600-square-foot roof section draining to one corner might need a rain garden between 120 and 180 square feet, depending on soil and desired depth. Adding a deeper filter bed shrinks that footprint requirement, since sizing tables in the Vermont DEC Rain Garden Manual show that a 12 to 24 inch filter bed layer meaningfully increases capture capacity per square foot of surface.
If your yard is tight, that’s the lever to pull: go deeper on the filter bed rather than wider on the footprint. It’s a straightforward trade, and it’s one most first-time builders don’t realize they have until they’re standing over a tape measure wondering how to fit a garden into a small side yard.
How Do You Test Your Soil’s Drainage Before Digging?
Skip this test and you’re guessing. Run it, and you know within an hour whether your site will work as planned or needs adjustment.
Late spring through early fall is the best window, after the ground has dried from winter thaw but before a summer drought bakes it rock hard. Testing right after a heavy rain skews your numbers toward “worse than reality.”
- Dig a test hole about 12 inches deep and 12 inches wide where the garden will go.
- Fill it with water and let it drain completely once, just to pre-saturate the soil (this mimics real-world conditions, not a dry test).
- Refill it to the top and mark the water level.
- Measure how far the water level drops every hour until the hole is empty.
- Calculate the average infiltration rate in inches per hour.
An infiltration rate above 0.5 inches per hour is workable with native soil. Between 0.25 and 0.5 inches per hour, plan to amend the soil with compost and coarse sand. Below 0.25 inches per hour, you’re looking at an underdrain system or a different site altogether.
Watch for warning signs that no amount of soil amendment fixes: a high water table (water seeping into your test hole from the sides), seasonal springs, or a nearby wetland. Those conditions mean the ground is already saturated for parts of the year, and a rain garden there won’t drain on schedule no matter what you add to it.
Pro Tip: Run the drawdown test twice, a week apart, if you can. One test after a dry spell and one after a normal rain gives you a more honest average than a single reading.
Designing the Bowl: Depth, Inlets, and Overflow
The ponding depth (how deep water sits before it soaks in) should generally run 4 to 8 inches, based on EPA design guidance, though some regional manuals allow depths up to 24 inches for specific site conditions, according to a rain garden guide from NOAA’s repository. Shallower is usually safer for a first build: it drains faster, holds less standing water, and looks more like a garden than a pond.
A level bottom matters more than most people expect. Water pooling unevenly means part of your garden stays wet too long while another part never gets irrigated. Snohomish County’s construction guidance recommends checking the bottom with a line level or string level at several points across the excavation, adjusting low and high spots as you go. On sloped yards, you’ll need a berm on the downhill side, built from compacted excavated soil, to hold water in rather than a retaining wall, which is overkill for most residential slopes under about 8 percent grade.
Protect the inlet where water enters the garden. A bed of river rock or a small rock forebay slows the water down and catches sediment before it clogs your soil. The Vermont DEC manual notes that a pretreatment area equal to roughly 10 percent of the rain garden’s surface area is a solid rule of thumb for sizing that forebay.
Every rain garden needs a planned overflow path for storms bigger than the design handles. Build a slightly lower notch in the berm, lined with rock, that routes excess water toward a lawn area or existing drainage swale rather than toward your house.
Choosing Soil Media: Native Ground or a Built-In Filter Bed?
If your drawdown test showed a good infiltration rate, you may not need to touch your native soil at all beyond loosening it and mixing in some compost. That’s the cheapest and simplest path, and it works fine in a lot of yards with reasonably sandy or loamy ground.
When infiltration runs slower, or your soil is heavy clay, a filter bed changes the math:
- No filter bed (0 in.): native soil, amended with compost, works when infiltration exceeds roughly 0.5 inches per hour.
- 12 in. filter bed: a mix of sand, compost, and topsoil, useful for moderate clay content and moderate space constraints.
- 24 in. filter bed: deeper engineered mix for heavier clay or where you want a smaller surface footprint, per the sizing approach in the Vermont DEC manual.
An underdrain (a perforated pipe at the base of the filter bed, tied to daylight or a storm line) becomes worth installing when your test showed poor drainage and you have nowhere for the water to go except through engineered media. It changes maintenance too: you’ll need to check the outlet periodically to make sure it isn’t blocked by roots or sediment.
When you’re buying materials, ask your supplier for a “rain garden mix” or specify the sand to compost to topsoil ratio directly. Generic topsoil alone compacts too easily and defeats the purpose.
Which Plants Go Where in a Rain Garden?
Think of your rain garden in three zones, and plant each one differently. The basin, or lowest center point, floods most often and needs plants that tolerate standing water for a day or two at a stretch. The mid-slope stays damp but rarely floods. The dry edge only gets wet during the heaviest storms and behaves more like a normal garden bed the rest of the time.
- Basin zone: native sedges, rushes, and moisture-loving grasses that handle periodic inundation without rotting.
- Mid-slope zone: flowering perennials and grasses that like consistent moisture but not standing water.
- Dry edge zone: drought-tolerant natives that can handle both occasional splash and long dry stretches between storms.
Deep-rooted native plants do more than look good. Their root systems penetrate compacted soil far better than turf grass, and that root structure is what keeps your infiltration rate from declining over the years. University of Nebraska Extension research on rain garden plant selection recommends a diverse mix of deep-rooted natives placed by zone specifically because that diversity maximizes both infiltration and habitat value. A monoculture of one grass species doesn’t hold up nearly as well over a decade.
Keep basin-center plants under about 3 feet tall so the garden doesn’t look like an overgrown ditch, and stagger bloom times across spring, summer, and fall so there’s always something flowering. A rain garden that only looks good in June isn’t pulling its weight the other eleven months.
Pro Tip: Don’t copy a plant list from a state three climate zones away. Contact your local extension office for a regional native plant list matched to your rainfall pattern and soil type. A sedge that thrives in the Pacific Northwest can sulk or die in the Southwest.
Building the Rain Garden Step by Step
Once your site, size, and soil test are settled, the actual build follows a fairly predictable sequence. Snohomish County’s handbook frames it as Plan, Build, Plant, Maintain, and that order matters. Skipping ahead to planting before the grading is right just means redoing work later.
- Pre-build checklist: confirm any local permit requirements, call 811 for utility locates, and gather tools (shovels, a wheelbarrow, a line level, and a tarp for spoil).
- Mark the outline with spray paint or a garden hose laid out in the shape you’ve designed, then double-check setback distances one more time.
- Excavate to the planned depth, piling spoil on a tarp so it’s easy to move or reuse for the berm.
- Build and compact the berm on the downhill side in thin layers, tamping each layer before adding the next, so it doesn’t settle unevenly later.
- Check the bottom with a line level at multiple points, filling low spots and shaving high spots until it reads flat.
- Install filter bed media, if your soil test called for one, in the specified depth and compact lightly.
- Armor the inlet with rock and build the forebay, then shape the overflow notch in the berm with rock lining.
- Test with a hose before planting: run water in and watch how it moves, adjusting the inlet or overflow if it doesn’t behave as designed.
- Finalize edging and grade the surrounding lawn or beds to blend smoothly into the garden’s rim.
Pro Tip: Run your hose test for at least 20 minutes, not just a quick splash. Problems like a low spot in the berm or a forebay that’s too small often don’t show up until the water’s been flowing for a while.
Planting and Establishing Your Rain Garden
Use containerized plants, not seed, for the basin and mid-slope zones. Seeds wash away in the first heavy rain before they have a chance to root, which is exactly why the Texas Center for Watershed Protection’s homeowner guide recommends 1 to 2 year container stock for basin planting. It costs more upfront than a seed packet, but it saves you from redoing the whole planting after the first storm.
- Plant at the same depth the plant sat in its container, no deeper.
- Loosen circling roots gently before placing the plant in the hole.
- Space basin plants 12 to 18 inches apart to fill in within a season or two.
- Apply 2 to 3 inches of mulch, keeping it clear of plant stems to avoid rot.
- Water deeply two to three times a week for the first month, tapering to once a week through the first growing season.
Once established, native plantings need very little supplemental water. Deep root systems that penetrate compacted soil, as Penn State Extension notes, are what let a mature rain garden coast through dry spells with minimal irrigation. Watch for new growth at the base of each plant by the second month. That’s your sign establishment is on track.
How Do You Maintain a Rain Garden Season by Season?
A rain garden built right needs less upkeep than a lawn, but it’s not zero maintenance. Spring means clearing winter debris from the inlet and checking for erosion where snowmelt ran through. Summer is weeding season, plus a close watch on new plants during any drought stretch. Fall calls for cutting back dead growth (or leaving seed heads for wildlife, depending on your taste) and clearing leaves from the inlet before winter rains hit. Winter just means checking the overflow path stays clear if you get freezing rain or ice.
Two problems show up more than any others: a clogged inlet and erosion where water enters the basin. Both usually trace back to skipping the rock forebay or undersizing it. If water is carving a channel at the inlet, add more rock or enlarge the pretreatment area rather than just patching the erosion scar, since patching alone doesn’t fix the underlying velocity problem.
The most common design mistakes are avoidable:
- Planting species that can’t handle either standing water or drought, depending on zone.
- Siting the garden where the drawdown test was never actually run.
- Skipping inlet armoring, which leads to sediment buildup and erosion within the first year.
- Building the bottom unlevel, so half the garden floods while the other half stays bone dry.
Call a professional if ponding persists well beyond 48 hours after a storm, if you see structural cracking in a berm, or if water is tracking toward your foundation instead of away from it. Those aren’t cosmetic problems. They’re signs the design itself needs correcting, not just a maintenance tweak.
Who Actually Builds These Well: Author and Project Notes
This guide draws on Sacred Garden Designs’ work building sustainable, water-wise landscapes across residential and commercial properties for over 25 years, with recognition that includes eight Houzz Awards and a Sustainable Business Council nomination. The firm’s design teams have handled slope stabilization and drought-adapted planting projects where rain garden principles solve real drainage problems, not just theoretical ones. One recurring pattern from that project history: yards with steep grade changes need berm engineering closer to what you’d see on a retaining wall project, which is where working with an experienced design-build team pays off over a weekend DIY attempt. Browse the Sacred Garden Designs blog for native-plant palettes and past project breakdowns.
Where to Find Official Rain Garden Manuals and Plant Lists
For sizing tables and construction detail beyond this guide, the Vermont DEC Rain Garden Manual and Snohomish County’s handbook offer the most complete step-by-step references. For plant selection specific to your climate, contact your local extension office directly rather than relying on a generic national list.
What Most Rain Garden Advice Gets Backwards
Most guides treat rain garden design as a math problem: measure the roof, plug numbers into a sizing table, done. That’s necessary, but it’s not what separates a garden that thrives for a decade from one that turns into a weedy mudhole by year three.
The soil test is the step people skip most, and it’s the one that determines everything downstream, from footprint to filter bed to whether you need an underdrain at all. Skipping it isn’t a shortcut. It’s a bet that your yard behaves like the average yard in a manual, and plenty of yards don’t.
The other underrated factor is plant zoning. Homeowners often buy whatever looks good at the nursery and plant it wherever there’s space, rather than matching root tolerance to how wet each zone actually gets. A rain garden with the right sedges in the basin and the wrong perennials on the dry edge will look patchy within two seasons, even if the grading and sizing were perfect.
If you’re doing this yourself, spend your effort on the test and the zoning, not the aesthetics. If the slope, soil, or scale of the project feels beyond a weekend job, that’s exactly the point where bringing in a design team pays for itself.
— Denise Buchanan
Ready to Build a Rain Garden That Actually Works?
If you’ve read this far and you’re weighing a DIY weekend project against hiring it out, the deciding factor is usually your slope and soil, not your ambition. A flat yard with decent drainage is genuinely doable yourself. A sloped lot, heavy clay, or a yard with multiple downspouts feeding one low point is where hiring an experienced professional pays off: years of water-wise landscape work means the sizing, berm engineering, and native plant selection get handled correctly the first time, instead of through trial and error over two rainy seasons.

Some landscape design firms also handle the pieces that extend beyond a single rain garden bed: irrigation design, slope stabilization, and full sustainable landscape plans that fold stormwater management into the rest of your yard. If your site includes sloped drainage or overflow routing challenges, a partner like Yard Smart’s irrigation services can help address the broader water routing picture alongside your rain garden.
Ready to see what a professionally designed rain garden looks like on your property? Request a consultation with Sacred Garden Designs and get a site-specific plan instead of guessing at sizing tables alone.
Sources
- Soak Up the Rain: Rain Gardens — EPA
- Rain Garden Manual (2021 update) — Vermont DEC
- Rain Garden Handbook — Snohomish County (2024)
- Stormwater management plant selection for rain gardens — University of Nebraska Extension (NebGuide)
- Rain gardens: a homeowner’s guide — Texas Center for Watershed Protection (TCWP)