Start with the water meter. Shut off every fixture in the house, then watch the meter’s flow indicator. If it keeps moving, water is escaping somewhere. Then run your irrigation zones one at a time to see which zone is the culprit. Most leaks turn out to be a cracked sprinkler head, a loose fitting, a valve that won’t seal, or a clogged or split drip line. All of those are fixable in an afternoon. This guide walks through the order we use to find them, what each symptom usually means, and where DIY stops.
TL;DR
- Confirm the leak first: with all indoor water off, a moving meter flow indicator over 2 to 3 hours means an active leak.
- Isolate it by zone. Run each zone alone and look for geysers, soggy ground, low pressure at the heads or a zone that never fully shuts off.
- Check the usual suspects in order: heads and risers, fittings, valves in the valve box, the backflow preventer, then buried pipe.
- Don’t seal hose-thread fittings with Teflon tape. A steady stream from a regulator or backflow device is a fault. A brief drip at shutdown often isn’t.
- Backflow preventers are regulated. Call your water supplier or a certified tester before repairing one.
Table of Contents
- Confirm you have a leak before you dig
- Know where your shutoffs are
- Work through the system zone by zone
- Sprinkler heads and risers
- Fittings and buried pipe
- Valves in the valve box
- The backflow preventer
- Pressure regulators and fittings that drip
- Drip system leaks
- Prevent the next leak
- Our perspective
- What a repair costs and when to call a pro
- When the fix becomes a redesign
- FAQ
- Sources
Confirm you have a leak before you dig
A wet patch in the yard doesn’t prove a leak. It could be an overwatered zone or a sprinkler head throwing water at the wrong angle. The meter test settles it.
- Turn off every tap, appliance and the icemaker. Make sure the irrigation controller isn’t mid-cycle.
- Find your meter, usually in a box near the curb. Lift the lid.
- Look at the flow indicator, often a small red or blue triangle or a dial. If it moves, or the reading changes over two to three hours, water is leaving the system.
- Close the irrigation shutoff or main valve to the system and test again. If the meter stops, the leak is on the irrigation side. If it keeps moving, look at the house plumbing first.
A plumbing-focused two-hour meter test explained for homeowners shows the same idea applied to leaks under a house, which helps you rule out indoor plumbing before you blame the sprinklers.
The stakes are real. In one EPA WaterSense case study, a malfunctioning valve at a townhouse complex was estimated to waste 262,440 gallons in a month, costing roughly $500. A single yard is smaller, but the principle holds: you pay for what runs unseen.
Know where your shutoffs are
Before you start troubleshooting, find the irrigation shutoff. It is usually a gate or ball valve near the meter, the house connection, or the backflow assembly. Label it. When a head snaps off and shoots a column of water, you want to know where to turn it off in seconds, not minutes.
Work through the system zone by zone
A residential system is a set of zones, each fed by an electric valve. Leaks tend to show up in one of three ways, and the symptom narrows where to look.
| Symptom | Likely cause | Where to look first |
|---|---|---|
| Geyser or fan of water at one spot | Broken head or riser, cracked fitting | The head itself, the swing pipe below it |
| Soggy, sunken or muddy ground that stays wet after the zone stops | Buried pipe or fitting leak | Low spots along the zone’s pipe run |
| Weak spray, low pressure at heads | Leak upstream of the heads, or a partly open valve | Fittings between the valve and the first head |
| Zone won’t shut off or heads weep after a cycle | Valve not sealing, debris, bad solenoid | The valve box |
| Water running when the controller is off | Stuck valve, leaking valve diaphragm | All valve boxes |
| Meter moves but no wet spot visible | Slow leak, or leak in a drain path | Valve boxes, the backflow device, any low area |
Run one zone at a time, from the controller’s manual setting, and walk the area while it runs. Pressure drops are a clue. If heads at the end of a zone only dribble, water is escaping before it gets there.
Sprinkler heads and risers
This is the most common and cheapest leak. Mowers, foot traffic and age crack the head bodies and risers.
- Head leaking at the base: Dig around it and check the threads. The riser may be cracked or cross-threaded. Replace the head or the riser.
- Head that won’t retract and weeps: Debris under the seal is common. Remove the cap, pull the screen and rinse it.
- Geyser: The head is missing or snapped. Turn off the zone, clear the soil, and thread on a new one at the same height.
Don’t over-tighten plastic. Hand-tight plus a small turn is enough in most cases.
Fittings and buried pipe
If the ground stays wet along a line and the heads are fine, the problem is in the pipe. Excessive water pressure is one of the leading causes of failed joints, and the EPA’s WaterSense program advises start-of-season inspections and pressure regulation to catch winter damage, valves that don’t close fully, and overpressure before they turn into leaks.
To repair a glued PVC line:
- Turn off the water and let the line drain.
- Dig out the wet spot, working carefully around the pipe, then let the hole drain so you can see the break.
- Cut out the damaged section with a pipe cutter.
- Install a slip coupling, or two couplings with a short length of new pipe, using primer and cement as the product directs.
- Allow the cure time on the cement label before pressurizing.
- Run the zone, watch the repair, and then backfill.
For a deeper look, the homeowner repair steps and cost ranges for valve work are a helpful companion when the leak is at a valve rather than the pipe.
Slow leaks are the expensive ones
A burst pipe announces itself. A slow leak doesn’t. If your water bill creeps up in summer without a change in the schedule, or you see one patch of lawn that is always greener or soggier, suspect a slow leak and repeat the meter test. A short, regular schedule check is cheaper than a mystery bill. If you’re also tuning how often you water, our guide to Los Angeles irrigation rules covers days and hours for that market.
Valves in the valve box
Open each valve box and look inside. A box full of water, or a valve that hisses or weeps, points to a failing diaphragm, a loose solenoid or debris under the seal.
- Turn off the water and the controller’s power before touching a solenoid.
- Remove the valve bonnet and clean the diaphragm and seat. Grit is the usual cause.
- Replace a cracked diaphragm or a failing solenoid. If the valve body itself is cracked, replace the valve.
- If you aren’t sure which valve belongs to a zone, run the zone from the controller and see which valve activates.
A zone that won’t turn off is almost always a valve problem, not a pipe problem.
The backflow preventer
The assembly near the house, usually a pressure vacuum breaker or reduced pressure assembly, protects your drinking water. Irrigation systems are a common source of cross-connections: when system pressure drops, contaminated water can be drawn back toward the public supply, which is why backflow prevention is regulated.
Two things to separate:
- Normal: Some devices release a little water briefly when the system shuts down, as designed, to relieve pressure.
- Not normal: A constant leak. Practitioners point to a worn O-ring, or a device installed in the wrong order relative to the timer. Valves and timers belong downstream of the backflow device, never upstream of it where sustained pressure can wreck it.
To narrow it down, one approach is to remove head-assembly components one at a time and run the system until the leak stops, starting with the backflow preventer, as described in the same troubleshooting guide.
Before you repair or replace one, call your water supplier. In many places these devices must be tested and certified by a licensed professional, with state or local rules deciding who can touch them and whether a permit is required. Texas’s TCEQ publishes a consumer guide to landscape irrigation that says owners should check local requirements before doing their own irrigation work. Your state and city rules will differ, so ask your local water provider.
Pressure regulators and fittings that drip
Two mistakes cause plenty of callbacks.
- Mistaking a relief port for a failure. Some regulators have a port that drips by design. A steady stream rather than a drip is the sign of a true failure.
- Sealing the wrong threads. Hose-thread fittings seal with a rubber washer. Teflon tape or pipe dope can stop the washer from seating or crack the plastic housing. Tape belongs on tapered pipe threads, not hose threads.
As a general rule: if a connection leaks, take it apart, check the washer or O-ring, clean the faces, and reassemble hand-tight before reaching for sealant.
Drip system leaks
Drip lines leak differently from sprays. The water is meant to come out slowly, so a leak is harder to see. A University of Florida extension publication notes that water dripping from an emitter and its wetting pattern are hard to see, which makes problems difficult to spot. You have to inspect the system, and that means turning it on and walking it.
Surface drip: what to check
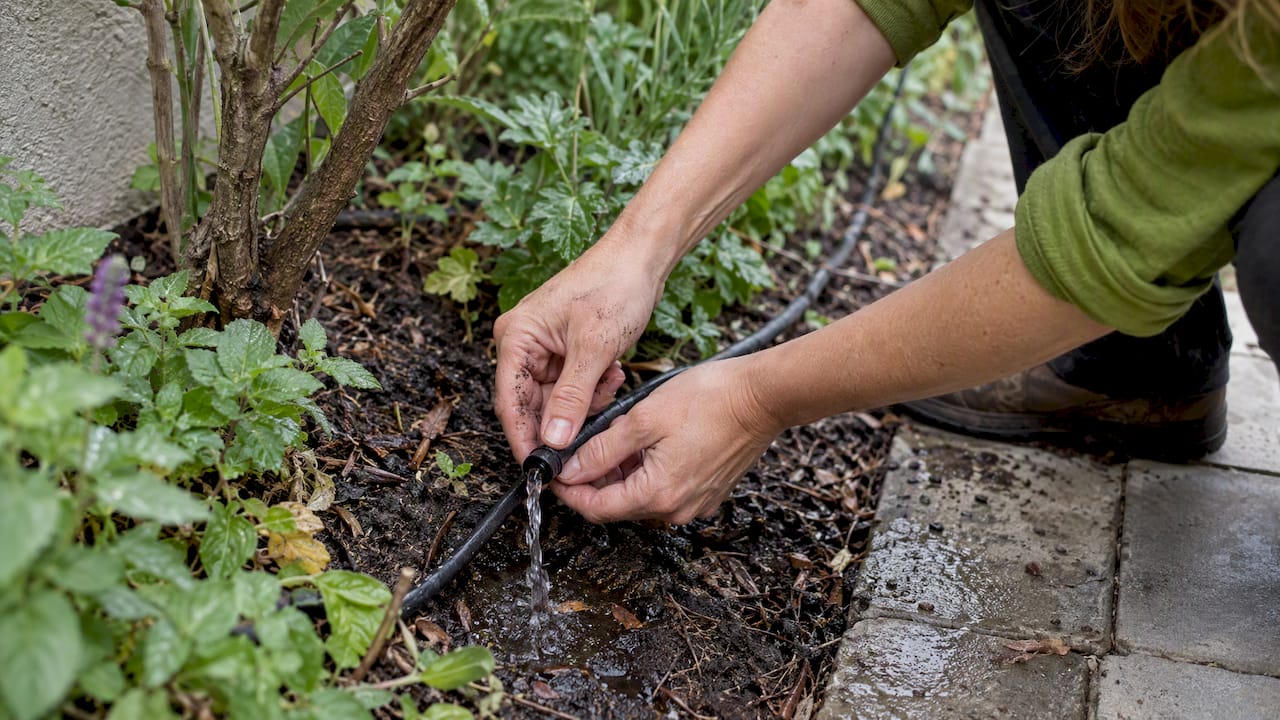
- Run the system and walk each line. According to UC Cooperative Extension, leaks in above-ground microirrigation are easy to detect, but you really have to inspect the system. Leaks are more often caused by damage than by loose connections.
- Look for geysers at punctured tubing (rodents, trimmers and shovels are the usual culprits), disconnected barbs, and open ends.
- Check the filter and pressure regulator at the head of the system.
- Repair a hole with a repair coupling or a goof plug, and replace damaged emitters.
- Flush the lines by opening the end caps for a short run to clear debris.
If you need replacement stakes, loops or tubing parts, a garden supplier that carries 1/4-inch drip tubing loop stakes can cover the small hardware that keeps lines in place and out of foot traffic.
Clogs look like leaks
Drip isn’t a set-and-forget system. Oregon State Extension notes that clogged emitters, often from sediment, algae or mineral deposits, are a primary failure mode that requires regular flushing. A clog upstream can push pressure up and blow a fitting, producing a leak somewhere else.
Buried drip lines
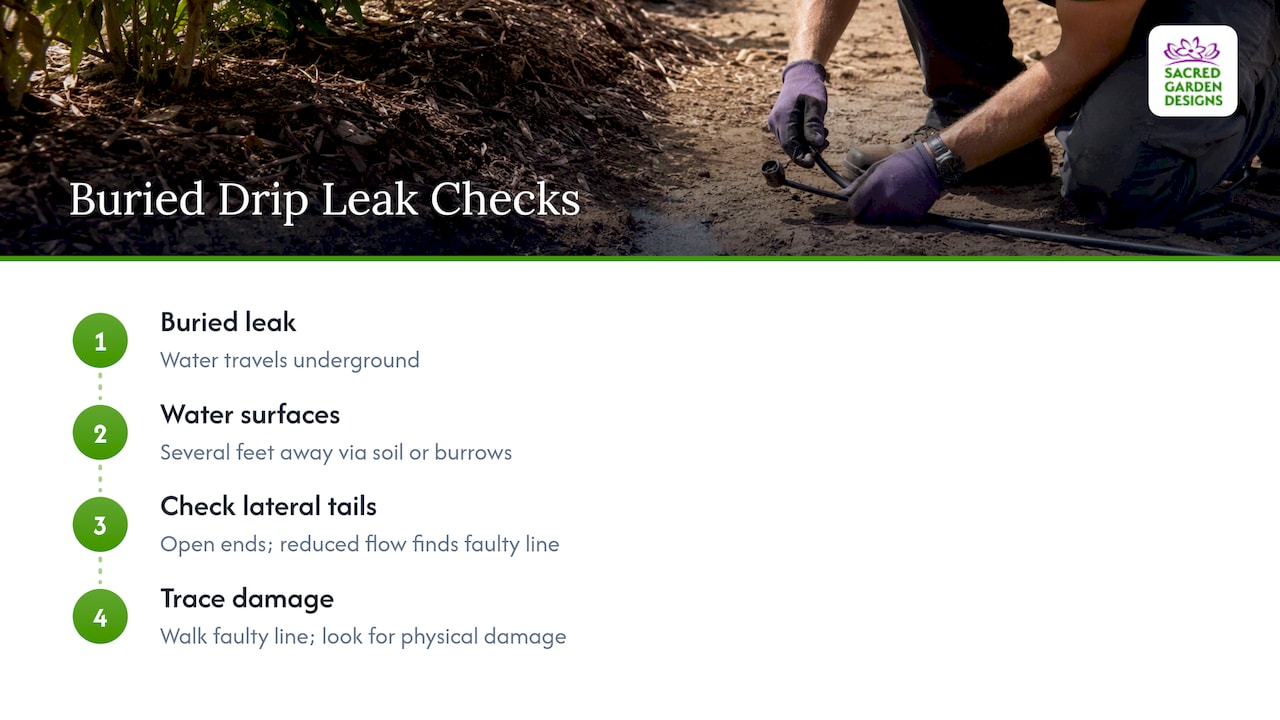
Subsurface drip is harder. UC extension warns that water can travel through disturbed soil or gopher burrows for several feet before surfacing, so a wet spot is not a reliable pointer to the leak. Open the tail ends of the laterals and check for reduced flow to find which line is faulty, then walk that line looking for physical damage.
How long should drip last?
Oregon State Extension puts high-quality drip tubing with in-line emitters at roughly 12 to 15 years when it is managed to prevent clogging and damage. Thin disposable drip tape is meant for seasonal use and gets replaced annually. If your system is older and keeps springing leaks, patching may cost more than replacing a zone.
If you’re building or rebuilding beds, see our walk-through of drip irrigation for raised beds for a kit, DIY or pro approach.
Prevent the next leak
Most leaks are preventable with a short seasonal routine.
- Start of season: Turn the system on zone by zone. Check for winter damage, valves that don’t close and heads that sit crooked. A two-step leak test and maintenance routine from a plumbing contractor is a good model for a quick check.
- Pressure: Fit a pressure regulator if your static pressure is high.
- Mulch and layout: Keep mulch off heads and valve boxes, and mark line locations before you dig new beds.
- Schedule: Pair repairs with a smarter schedule. Our garden maintenance schedule is built around frost dates rather than fixed calendar days.
- Reduce demand: Deep, infrequent watering, mulch and plant choices cut how much water the system moves at all. See deep root watering methods and drought tolerant landscaping.
Our perspective
We design and install irrigation as part of water-wise landscapes, and the pattern we see is that leaks rarely begin as leaks. They begin as design choices: one oversized zone, sprays on slopes where water runs off, a drip line laid where people will walk, no pressure regulation, a valve box nobody can find. Fixing the leak without fixing the layout means fixing it again next year.
Our advice is to treat a leak as a prompt to look at the whole system. Ask whether each zone matches the plants it feeds, whether slopes are watered slowly enough to soak in, and whether a drip line could replace spray on beds. In a drought-prone region, the cheapest gallon is the one you never move, and a landscape designed for less water has fewer places to fail.
— Denise Buchanan
What a repair costs and when to call a pro
Costs vary by region and by problem. HomeGuide puts the average irrigation repair at $100 to $400, with minor fixes such as head replacements or small leaks starting around $50 and underground leaks or larger rebuilds reaching $600 or more.
DIY is reasonable for heads, risers, accessible fittings, valve cleaning and drip line patches. Call a professional when:
- the meter keeps running after you’ve closed the irrigation shutoff and checked the house;
- the leak is in a mainline under pavement, a patio or a driveway;
- a backflow preventer needs repair, testing or replacement;
- a slope is saturated or slumping, because water may be loosening the soil;
- you see repeated failures across several zones, which suggests a pressure or design issue.
When the fix becomes a redesign
Sometimes the right answer is a different system. If your zones are old, mismatched or watering lawn that you’d rather replace, redesign pays back in lower water use and fewer repairs. Sacred Garden Designs handles irrigation design and installation, slope stabilization and sustainable landscape design in Los Angeles and beyond. Our design services are published at $1,500 for yards under 5,000 sq. ft. and $2,500 for a full landscape design. Irrigation installation is quoted per project. See our landscape design services or browse all services, including an initial landscape consultation.
If you’re thinking about replacing thirsty turf as part of the fix, our guide to lawn alternatives that cut water use shows how to match them to play, pets and shade.
FAQ
Can sprinklers still leak even if the system is shut off?
Yes. If the controller is off but water still escapes, a valve may be stuck partly open or its diaphragm may be worn, or a fitting under constant pressure may be failing. Close the irrigation shutoff and see whether the meter stops moving. If it does, the leak is on the irrigation side, and the valve boxes are the first place to look.
How much does it cost to fix an irrigation leak?
HomeGuide reports an average of $100 to $400 for irrigation repair. Simple fixes such as a broken head can start around $50, while underground leaks may reach $600 or more. Your cost depends on local labor rates and how deep the problem is.
What is the life expectancy of a drip irrigation system?
Oregon State Extension says high-quality tubing with in-line emitters lasts about 12 to 15 years when it’s protected from clogging and physical damage. Disposable drip tape is built for seasonal use and needs yearly replacement.
How do I fix a leaking backflow preventer?
First work out whether it’s a brief release at shutdown, which can be normal, or a constant leak, which usually points to a worn O-ring or a wrong installation order. Then call your water supplier. Backflow devices are commonly tested and certified by licensed professionals, and local rules decide who may repair them.
Sources
- Certified Professionals in Action, US EPA WaterSense
- WaterSense sprinkler spruce-up brochure, US EPA
- Cross-Connection Control and Backflow Prevention, US EPA
- Leaks, Maintenance of Microirrigation Systems, UC ANR
- Drip Irrigation, Oregon State University Extension
- Drip-Irrigation Systems for Small Conventional Vegetable Farms, UF/IFAS
- Troubleshooting a leaking system, Drip Depot
- How to find and resolve leaks in a drip irrigation system, Dripworks
- Texas Commission on Environmental Quality
- How Much Does It Cost to Repair an Irrigation System, HomeGuide
- How to Fix a Leaking Sprinkler Valve, Angi