Build raised beds no wider than 4 feet, with 18 to 24 inch paths (30 inches for wheelbarrow routes), and plant them using the square-foot or block method on 10 to 12 inches of active soil. That combination lets you reach the center from either side without ever compacting the soil, and block planting packs in more food per square foot than row planting ever will. Sketch it first with stakes and string before you cut a single board.
TL;DR:
- Keep raised beds no wider than four feet to allow easy access from both sides without soil compaction, especially if you use block planting methods.
- Use 4×4 or 4×8 modules to simplify building, ensure proper sizing, and facilitate ease of replication or expansion over time.
- Plan for soil mixes of equal parts compost, topsoil, and aeration material, with a depth of 10 to 12 inches suitable for most vegetables.
- Orient beds east-west with the tallest crops on the north side to prevent shading, and adjust based on nearby structures or shade patterns for optimal sun exposure.
- Incorporate drip or soaker hose irrigation, and verify site conditions with stake-and-string tests to avoid issues like poor drainage or overly narrow pathways.
Table of Contents
- What are the essential dimensions for a raised bed layout?
- Square-foot planting vs. traditional rows: which layout wins?
- How much soil do you need, and what’s the best mix?
- How should you orient a raised bed for the best sun exposure?
- What’s the best watering setup for a raised bed layout?
- How do you plan a raised bed layout step by step?
- Three practical 4×8 layout plans to copy
- How do you keep a raised bed productive season after season?
- Designer notes from Sacred Garden Designs
- How does companion planting fit into a raised bed layout?
- Why compact, modular beds make the best starting point
- Ready to build your raised bed layout the right way?
- Sources
What are the essential dimensions for a raised bed layout?
Get the numbers right before you buy lumber, and everything downstream gets easier. The width matters most: cap beds at 4 feet if you can walk around both sides, or 2 feet if the bed backs against a fence or wall and you only reach in from one side. Go wider and you’ll find yourself kneeling on the soil to reach the middle, which compacts it and undoes half the benefit of raising the bed in the first place, according to UGA’s Extension research on raised bed dimensions.
Paths need just as much thought as the beds themselves. Give yourself paths wide enough for easy foot traffic, and wider paths where you expect to roll a wheelbarrow or carry heavy loads.
For sizing, 4×4 and 4×8 modules are the standard for a reason: they’re easy to build from standard lumber lengths, easy to cover for frost, and easy to replicate. Height typically runs about one foot for most vegetables, but if you or a family member needs to garden from a seated position or without bending far, raise that to about two feet.
Before you build, gather:
- Rot-resistant lumber or composite bed material
- Bulk topsoil, compost, and aeration material
- Wooden stakes and mason’s string for layout testing
- Landscape fabric or cardboard for path bases
- Basic drip irrigation fittings
Square-foot planting vs. traditional rows: which layout wins?
Block-style, square-foot planting means dividing your bed into a grid, typically one square foot per section, and filling each square with a set number of plants based on their mature size. It packs plants closer than row gardening allows, and the dense canopy that results shades the soil surface and chokes out weeds before they get established. Colorado State University Extension’s research on block-style layouts in raised beds also notes that these tighter plantings warm up faster in spring, letting you start earlier and cover the whole bed with a single frost blanket instead of fussing with row covers.
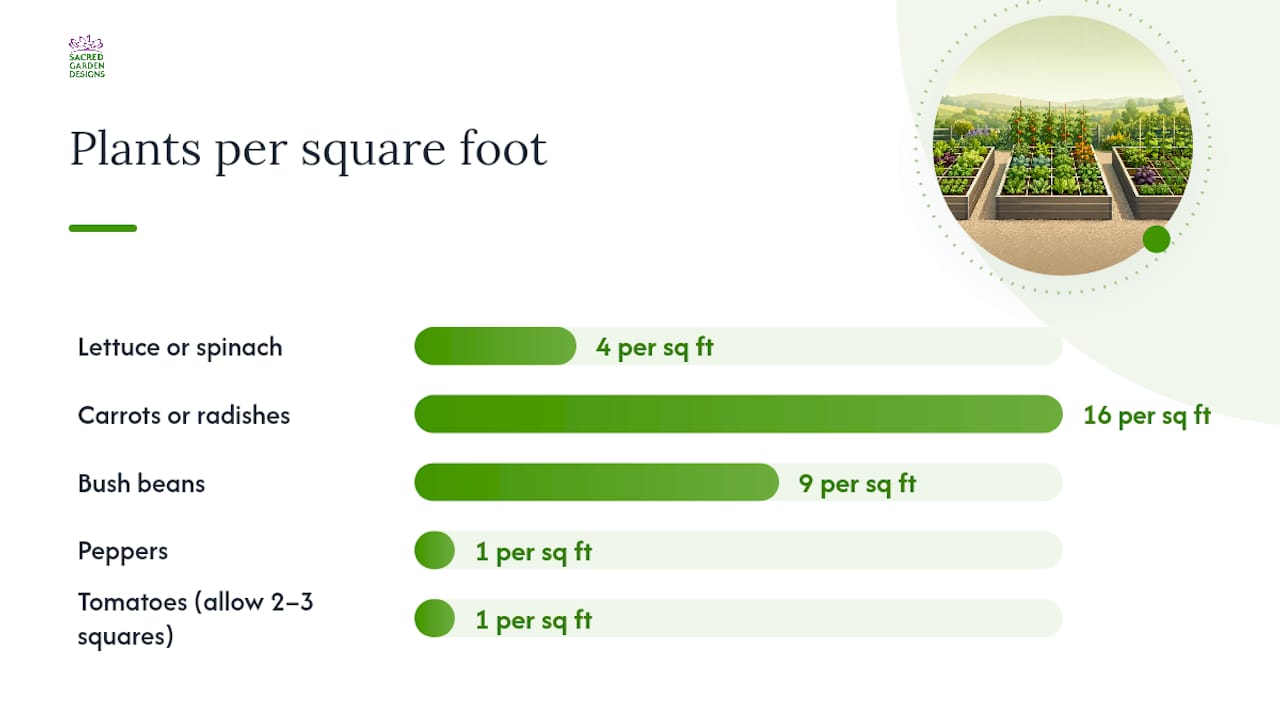
Here’s roughly how many plants fit per square foot for common crops:
- Lettuce or spinach: 4 per square
- Carrots or radishes: 16 per square
- Bush beans: 9 per square
- Peppers: 1 per square
- Tomatoes: 1 per square, but give it 2 to 3 squares of clearance around it
Traditional rows still make sense for a few crops. Sprawling vines like winter squash or melons, or anything you plan to hill up like potatoes, do better with row spacing than crammed into a grid. Inside a 4×8 bed, you can run one or two rows along the long edge and dedicate the rest to block planting.
Pro Tip: Put trellised crops like pole beans, cucumbers, or indeterminate tomatoes along the north edge of the bed and let them climb vertically. You’ll free up ground space for low crops and avoid shading anything that needs full sun.
How much soil do you need, and what’s the best mix?
Two mix ratios dominate raised bed advice, and each has a legitimate use case. The classic Mel’s Mix approach splits evenly into thirds: compost, topsoil or loam, and a coarse drainage material like perlite or coarse sand. A more budget-friendly version runs 60% topsoil, 30% compost, and 10% aeration material, and it performs nearly as well for most vegetables at a lower cost per cubic yard, based on Trowelful’s raised bed soil guide.
Depth depends on what you’re growing and what’s underneath the bed. Most mixed vegetable plantings do fine with roughly 10 to 12 inches of active soil. Deep-rooted crops or beds on hard surfaces, where roots can’t reach native soil, benefit from deeper soil up to about two feet.
| Mix type | Ratio | Best for |
|---|---|---|
| Mel’s-style | equal parts compost, topsoil, and aeration material | Beds on native soil, mixed vegetables |
| Economical | roughly 60% topsoil, 30% compost, and 10% aeration material | Larger beds, budget-conscious builds |
For a standard 4×8 bed filled to about one foot, you need roughly one cubic yard of soil. Order slightly more soil than the calculation to allow for settling during the first season. If cost is tight, some gardeners bulk-fill the bottom third with logs, branches, or straw before topping with real soil, a method sometimes called Hugelkultur-lite, but expect more settling over time and plan to top up sooner.
How should you orient a raised bed for the best sun exposure?
Orientation decides whether your short crops get scorched by shade from your tall ones. If your bed runs east to west, put your tallest plants, trellised beans, staked tomatoes, sunflowers, along the north edge so they never cast shadows over the shorter crops in front of them. Running the bed north to south instead means both sides get roughly even light throughout the day, though the University of Minnesota Extension notes that fence lines, existing trees, or your house’s shadow can override the textbook answer.
A few adjustments worth making on-site:
- Light-colored fences or walls nearby can reflect extra heat and light onto adjacent rows, useful for peppers, risky for lettuce
- Wind corridors between buildings may call for a windbreak on one side of the bed
- Sun-sensitive greens like lettuce and spinach appreciate a little afternoon shade in hot climates, so tucking them behind a taller plant isn’t always a mistake
Picture the bed in three bands running front to back, or north to south: a tall band for anything trellised or staked, a mid band for bushy plants like peppers and bush beans, and a low band along the sun-facing edge for lettuce, herbs, and root crops. That gradient keeps every plant getting the light it actually needs.
What’s the best watering setup for a raised bed layout?
Drip lines or soaker hoses beat overhead sprinklers in a raised bed almost every time, since they deliver water straight to the root zone instead of soaking foliage that then invites fungal problems. Run a soaker hose in a loop or zigzag pattern along the length of a 4×8 bed, and place your spigot or timer connection at the end nearest your water source so hose runs stay short and manageable.
A few more layout details worth locking in early:
- Choose gravel or mulched paths over solid pavers if drainage is a concern, since hardscape paths shed water into the beds
- Wood chips keep paths comfortable underfoot and suppress weeds between beds
- Widen your main aisle to 36 inches if a wheelchair, walker, or garden cart needs to pass through regularly
Pro Tip: If accessibility matters, raise the bed height to 24 inches and build a slightly wider cap board on top. It doubles as a seat, which takes real pressure off anyone who can’t kneel or bend for long stretches.
How do you plan a raised bed layout step by step?
Skipping the planning stage is where most beginners go wrong, not the building. Walk the actual site first and mark anything fixed, like a downspout, a tree’s root zone, or a property line, that will constrain where beds can go.
- Measure the space and note sun exposure at different times of day
- Drive stakes at the corners of your planned bed and path widths, then run string between them
- Walk the mock layout as if you were gardening: reach into the bed, push a wheelbarrow down the path, check that nothing feels cramped
- Decide on single-side or double-side access for each bed based on what’s behind it
- Finalize your order list: soil volume in cubic yards, lumber cut to length, and any drip irrigation fittings
Texas A&M AgriLife Extension’s guidance on raised bed gardening makes a point worth repeating: problems that are invisible on paper, like a path that’s too narrow for your actual gait, show up the moment you walk it with stakes in the ground.
Three practical 4×8 layout plans to copy
Every one of these fits a single 4×8 bed divided into 32 one-foot squares, so you can adapt the counts to whatever you actually eat.
The compact kitchen plan: 8 squares of leaf lettuce and spinach along the sunniest edge, 4 squares of carrots, 4 of radishes for a fast early harvest, 6 squares of herbs (basil, cilantro, parsley), and the remaining 10 squares in a rotating mix of bush beans and scallions. Radishes come out in three to four weeks, freeing those squares for a second lettuce sowing.
The family staples plan: 2 squares for tomatoes with cage support, 4 for peppers, 9 squares of bush beans, 8 of carrots, and 9 of mixed greens. This spread balances calorie crops with quick-turnaround vegetables.
The trellis and basil plan: Run a trellis along the entire north edge and dedicate 4 squares to indeterminate tomatoes and 4 to pole beans, spaced to avoid crowding. Fill the remaining squares with basil, since it thrives near tomatoes and the airflow from vertical growth keeps foliage disease down.
How do you keep a raised bed productive season after season?
Start every season with three quick checks: soil pH, whether the soil level has dropped since last year, and whether water is draining freely or pooling. Top-dress with 2 to 4 inches of fresh compost each season rather than replacing the whole mix, and hold off on synthetic fertilizer until a soil test tells you it’s actually needed.
Succession planting keeps squares working instead of sitting empty. Pull early radishes and drop in bush beans. Follow spent lettuce with a fall planting of greens once the heat breaks. Rotate crop families between seasons, moving tomatoes out of a square that grew peppers the year before, to avoid the nutrient depletion and pest buildup that comes from planting the same family in the same spot repeatedly.
If water is pooling on the surface instead of soaking in within a few minutes, that’s a compaction sign; a University of Minnesota Extension review of raised bed performance points to switching from row planting to block planting as one of the more effective fixes gardeners make, since it means you’re never standing on the growing area to weed or harvest.
- Check pH and drainage before the first planting of the season
- Top-dress with 2 to 4 inches of compost annually
- Rotate crop families bed to bed or square to square
- Watch for standing water as an early compaction warning
Designer notes from Sacred Garden Designs
Denise Buchanan, on-site design testing.
Professional designers rarely trust a layout until they’ve walked it. Sacredgardendesigns, active in sustainable landscape design for over 25 years and recognized with eight HOUZZ Awards, applies the same stake-and-walk method described above on client sites, adjusting path widths on the spot when a wheelbarrow or a client’s mobility needs demand more clearance than the textbook number.
On a recent accessibility-focused build, widening a single path from 24 to 36 inches changed how a client actually used the entire garden. That’s the kind of detail you only catch by walking the space, not sketching it.
Water-wise practice shapes every bed the firm designs: drip lines set beneath a light mulch layer, and soil mixes chosen to hold moisture without waterlogging roots.
How does companion planting fit into a raised bed layout?
Companion planting works better in a raised bed than in open rows, because the tight block spacing already puts compatible plants close enough to interact. Basil beside tomatoes is the classic pairing: some gardeners report better flavor, and the dense basil canopy shades the soil around tomato roots. Marigolds tucked into a corner square or along an edge are a common pest-deterrent choice, and nasturtiums planted near squash or cucumbers can pull aphids away from the main crop.
Height and light needs matter just as much as pest logic. Pair a trellised crop with a shade-tolerant one at its base, pole beans over lettuce, for instance, and you’re using vertical space that would otherwise sit unclaimed. Avoid planting alliums like onions or garlic directly next to beans or peas, since they tend to stunt each other, a detail easy to miss when you’re just filling squares to use up seed packets.
The block-planting format also makes crop rotation and companion planting work together more easily than a row garden does. Because each square is a discrete unit, you can swap a square’s occupant year to year without redesigning the whole bed, keeping compatible neighbors in place while rotating the actual plant families through for pest and nutrient management. Treat your grid as a living puzzle: some squares stay fixed as anchor plants (perennial herbs, for example), while the annual squares around them shuffle each season based on what grew there last and what pairs well with the anchors.
Why compact, modular beds make the best starting point
Start with one 4×8 bed, not four. It’s easier to test your soil mix, your sun assumptions, and your own stamina for weeding on a single module before you commit lumber and soil budget to a bigger footprint. A layout that looks great on paper often reveals its flaws only after a full season, and a modular approach means expanding is just adding another identical block, not redesigning from scratch. Build one, garden it hard for a year, then decide what your next bed should fix.
— Denise Buchanan
Ready to build your raised bed layout the right way?
Getting the math right on paper is one thing. Getting the orientation, drainage, and irrigation routing right on your actual property, with your actual sun angles and water pressure, is where most DIY layouts fall short. Sacredgardendesigns designs and installs raised beds as part of full water-wise landscape projects, using the same stake-and-walk testing and soil-mix decisions covered above, adapted to your yard’s specific slope, sun, and soil.

If you’d rather skip the trial-and-error phase entirely, especially for an accessibility-focused build or a yard with tricky drainage, a professional site visit catches problems no blog post can. Sacredgardendesigns offers consultations covering raised-bed design, drip irrigation layout, and accessible bed heights for anyone who wants beds built right the first time. Visit the Sacredgardendesigns site to request a site visit and get a layout plan built around your actual yard, not a generic template.
Sources
The specs in this guide come from university extension research and dedicated raised-bed resources, not general blog consensus.